EQuIS Information Agents (EIAs) are created and configured using the Widget Editor in the EZView widget. EIAs can also be edited from the EIA widget. Use either widgets to open the EIA Editor. There are two tabs on the EIA Editor—the Data tab and the EQuIS Information Agent tab.
Note: Existing EIAs may only be edited by the original creator of the EIA or by an Administrator.
If the original EIA creator needs to be disabled, we recommend changing the user ID associated to the EIA in ST_REPORT_EVENT.USER_ID to point to an active and licensed user. |
|---|
Open the EIA Editor
Note: Only user reports created by EQuIS Enterprise users (whether in EQuIS Professional or Enterprise) will work with EIAs. |
|---|
EZView Widget
Open the Widget Editor by selecting the More Options ![]() icon in the upper right corner of the EZView widget to display the drop-down menu and then select the Edit menu option.
icon in the upper right corner of the EZView widget to display the drop-down menu and then select the Edit menu option.
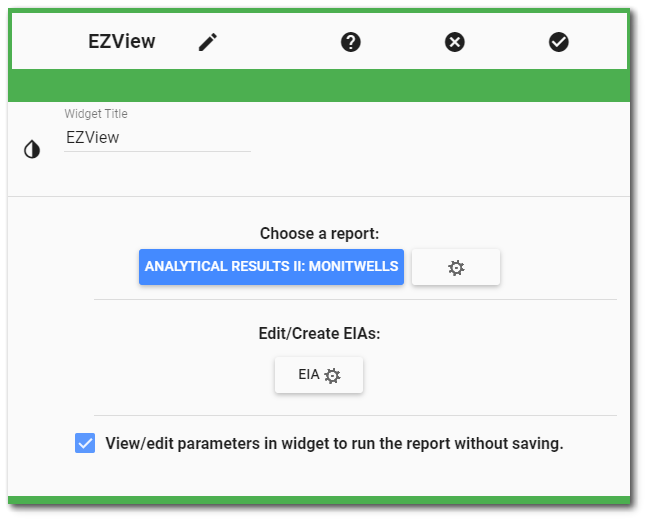
Choose a report. Click the EIA ![]() button to open the EIA Editor and set the properties for an EIA for the selected report.
button to open the EIA Editor and set the properties for an EIA for the selected report.
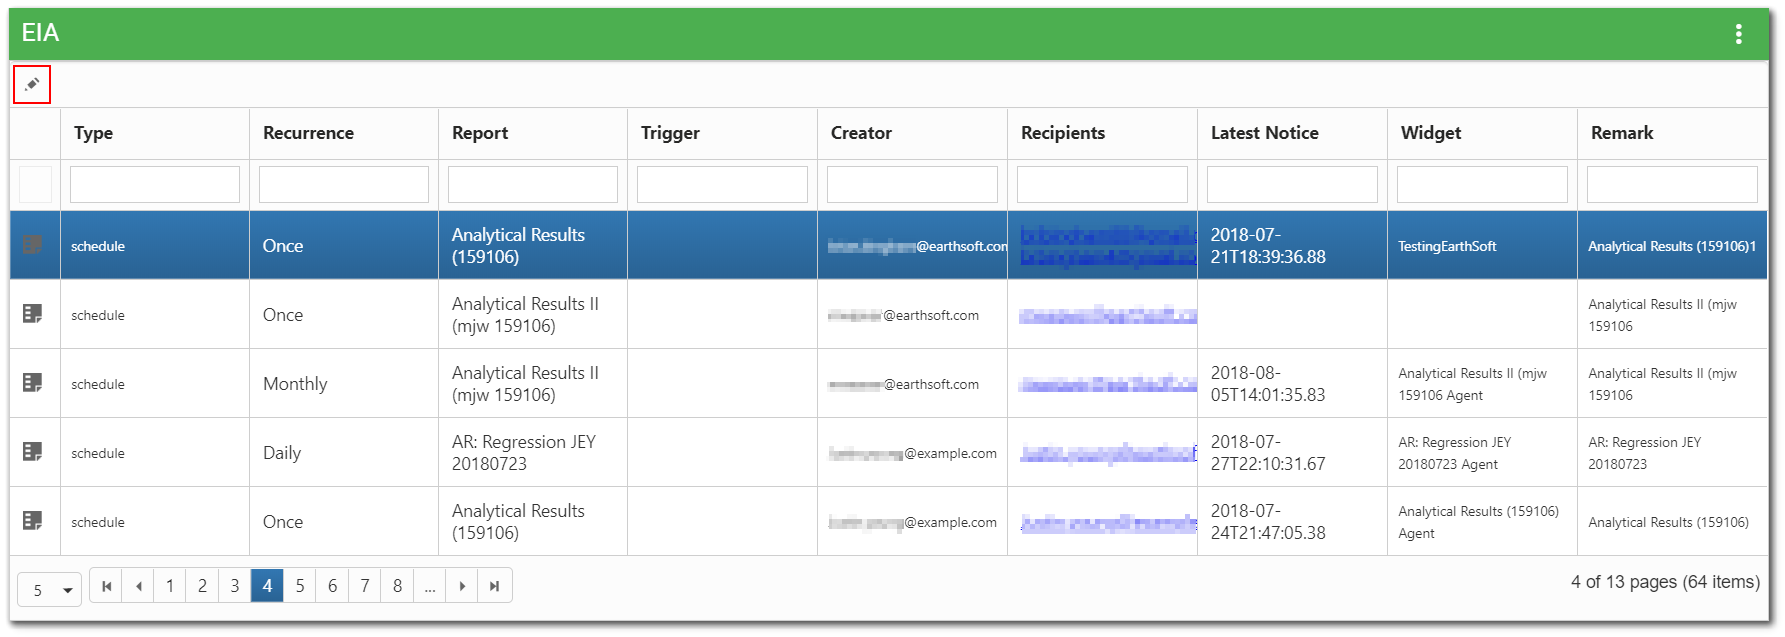
EIA Widget
To edit an EIA, select the desired EIA (row in the grid) from the widget. The row will be highlighted in blue, and the Edit ![]() icon at the top of the grid will be enabled. Click the Edit
icon at the top of the grid will be enabled. Click the Edit ![]() icon to open the EIA Editor window for the selected report.
icon to open the EIA Editor window for the selected report.
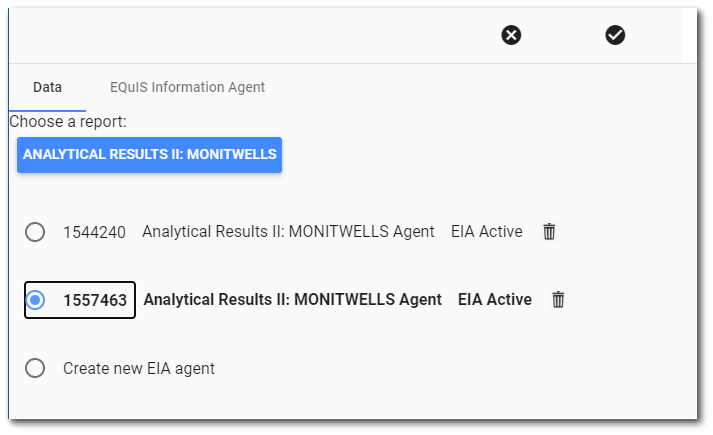
EIA Editor – Data Tab
The Data tab lists any existing EIAs and provides a means to modify them or create a new EIA. Each EIA is assigned a unique REPORT_EVENT_ID in the ST_REPORT_EVENT table when the EIA is created. The EIA REPORT_EVENT_ID value is displayed before the associated report name for the existing EIAs.
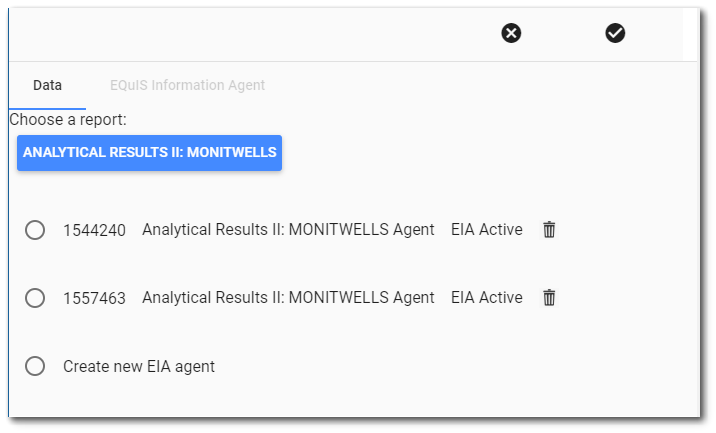
If the user wishes to change the selected report while implementing an EIA, the Data tab provides a link to the Report Chooser and the Report Parameter Editor.
Either select an existing EIA or click the Create new EIA agent radio button to enable the EQuIS Information Agent tab.
EIA Editor – EQuIS Information Agent Tab
Check the Enable Agent (EIA) for this report check box to enable an EIA for the report. To remove an EIA, uncheck this check box.
The EIA will run the selected report and send the information according to the EIA type and settings. Some settings allow the report to run multiple times, depending on a set schedule or other factors. Note that if the report was supposed to have run at least one time during a period of time, but did not for some reason (such as report generation was disabled in the Workflow Widget properties for that day or time of day), the report will run one time for all the missed times.
Note: For clients using EQuIS Online (hosted), EIA execution times are always in Coordinated Universal Time (UTC). |
|---|
Once run, the EIA can be configured to deliver an email notification OR to use a webhook to connect to a Uniform Resource Identifier (URI) for an external Web service, such as Microsoft Power Automate, Teams, SharePoint, Logic Apps, etc.
Set EIA Type
Choose which type of agent to use and configure the EIA settings.
New Data (EDD) – Sends a report when a new EDD arrives. There is a short delay of approximately 15 minute between when an EDD is loaded into the database and when an EIA may report on that event. At run time, the values for FACILITY_ID and EBATCH from the EDD are passed to the report, replacing the parameter values saved with the report.

Once the New Data (EDD) option is selected, the agent can be configured to further limit what EDD information is applicable to the report by clicking on any of the following settings in the Event Info section:
•EDDs facility must match Report's facility – If this setting is checked, then the agent will only run if the EDD was loaded to a facility that equals the facility identified in the report's FACILITY_ID parameter or is a member of the group identified by the report. If the report has no FACILITY_ID parameter, the value may be set in the ST_USER_REPORT.FACILITY_ID database field for the report.
•Limit report to only data within the EDD (i.e. new data) – If this setting is checked, the generated report will be limited to the data from the submitted EDD. If it is unchecked, the report will be run according to the report parameter settings. This is performed by passing the EDD's ebatch number to the report's EBATCH parameter. If unchecked, the value -1 is passed to the report. The report must support this feature by interpreting -1 to mean that this parameter should be ignored. When this box is unchecked, the generated report will display all data in the EQuIS database and incoming EDD matching the previously defined criteria.
Note: The Limit report to only data within the EDD (i.e. new data) option MUST be selected for "by EDD" reports (e.g., Analytical Results by EDDs) to run as an EIA and return results ONLY from that submitted EDD. |
•Limit agent to data trigger – Allows definition of a secondary "Trigger Report" to determine if the waiting report, identified on the Data tab, should be run. When an EDD is loaded, the "Trigger Report" is run and limited to only data within the EDD. If the "Trigger Report" returns any results, then a task is created to generate the waiting report. If the "Trigger Report" does NOT return any results, then the waiting report is not run. Since using an existing report as the "Trigger Report" runs the risk of parameters being changed elsewhere, you will need to create a new report to use for this purpose.
To define the "Trigger Report", perform the following steps:
1.Select the type of report from the Define Trigger drop-down list. One option is "Report triggers itself." If this selection is made, no other steps are needed.
2.In addition to the "Report triggers itself" option, a list of available user reports will be displayed. Select the desired report.
Note: The list of available user reports contains all users reports for which a user has permission and the base report has the MAY_TRIGGER_OTHERS_YN field set to “Y” in the ST_REPORT table. |
Limit to a Specific Format
In addition to the options provided in the EIA Editor, "New Data" EIAs can also be limited to a specific EQuIS format using the ST_REPORT_EVENT table. To implement this option, create the New Data EIA then return to the Data tab in the EIA Editor. The new EIA will be displayed at the bottom of the list of EIAs. Note the REPORT_EVENT_ID of the recently created New Data EIA. Using EQuIS Professional, open the ST_REPORT_EVENT table and search for the ID value of the new EIA in the REPORT_EVENT_ID column. In the data row for the selected EIA enter the EQuIS format name in the FORMAT_NAME column. The format name should be typed exactly as the format is registered in the database. Then when a new EDD is loaded via Enterprise EDP, the EIA will only be triggered when ST_EDD_BATCH.EDD_TYPE matches ST_REPORT_EVENT.FORMAT_NAME for the REPORT_EVENT_ID of the specific EIA.
Once – Send the report once (and no recurring event or schedule). This option is useful for generating long running reports that would cause the web browser to abort before completion. There is no auto-delete to remove these agents once the report is generated and delivered.
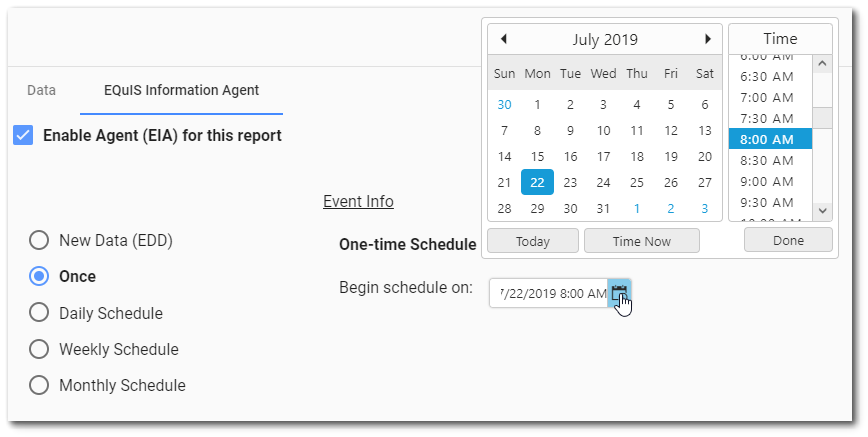
Begin schedule on – This is the date and time the schedule will begin to run. This will default to the current date and time. The date/time may be edited using the calendar tool or by entering the date/time manually in the text box. Click the calendar tool icon ![]() to use the calendar tool. Note that when entering the date manually in the text box, the date must be in the same format as the current default date. Changing the value in the text box will also update the calendar tool. The calendar shows the selected date highlighted in blue and today's date highlighted in gray. If Today's date is selected in the calendar tool, it will remain highlighted in blue. To select a different month or year using the calendar control, click on the name of the month or the arrow pointing forward at the top of the control. This changes the calendar tool from the month view to the year view. Once in the year view, scroll through the available years as desired. The current selected month will be highlighted in blue. Select the desired month/year combo to return to the month view to pick a specific date. Scroll in the Time pane to select the desired time. Click the Done button to save the selected date and time.
to use the calendar tool. Note that when entering the date manually in the text box, the date must be in the same format as the current default date. Changing the value in the text box will also update the calendar tool. The calendar shows the selected date highlighted in blue and today's date highlighted in gray. If Today's date is selected in the calendar tool, it will remain highlighted in blue. To select a different month or year using the calendar control, click on the name of the month or the arrow pointing forward at the top of the control. This changes the calendar tool from the month view to the year view. Once in the year view, scroll through the available years as desired. The current selected month will be highlighted in blue. Select the desired month/year combo to return to the month view to pick a specific date. Scroll in the Time pane to select the desired time. Click the Done button to save the selected date and time.
Daily Schedule – Schedule reports on a daily recurrence. Daily recurrences can occur every day or every N days. Daily recurrences schedules may also include a time base recurrence to schedule the report to run multiple times during the day.
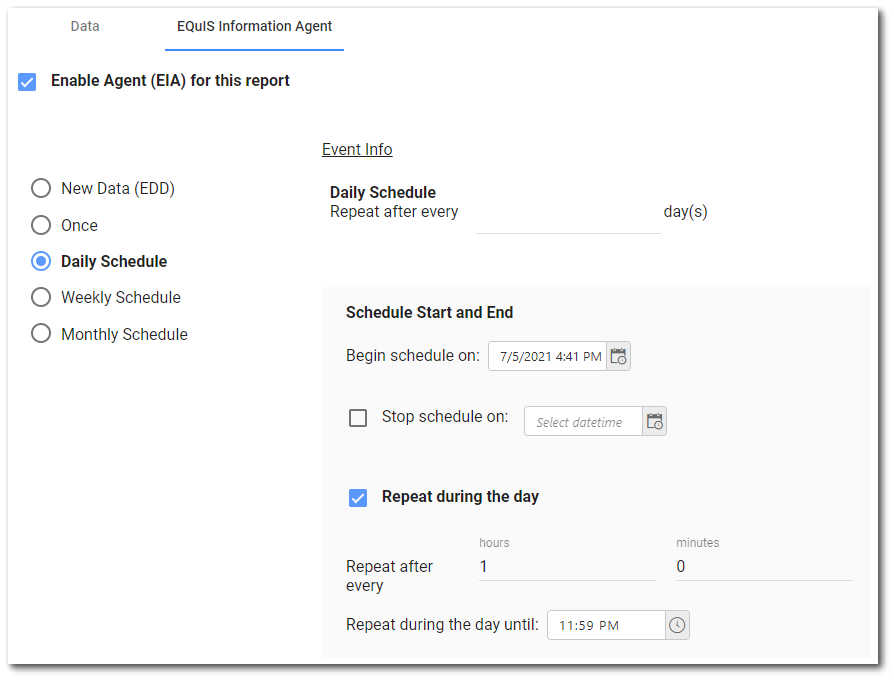
Daily Schedules are configured as:
Repeat after every ____ day(s) – Entering a positive integer value will result in a schedule that starts at "Begin schedule on" and repeats every N days.
Scheduled Start and End
•Begin Schedule On – The date/time the schedule will begin. This is a required field. The hour portion of the time field is corrected from UTC. If "Repeat during the day" is enabled, the time recurrence is relative to this time.
•Stop Schedule On – The date/time when the recurrence should end. This field must be enabled by selecting the check box. When null, the recurrence has no end.
•Repeat during the day – Schedule the agent to run more than once per day by checking this option.
•Repeat after every – These fields are enabled by the above check box. When enabled, the valid range of values is 0 to 23 hours and 0 to 59 minutes.
•Repeat during the day until – This option is enabled by the above check box. The hour portion of the time field is corrected from UTC and may represent a time either on the previous day or the following day. The end time must be after "Start Time." The end time will be 11:59 PM or 23:59, local time, by default.
Note: If both the repeat after every hour and minutes text boxes are left blank, repeat after every one minute is assumed. |
Weekly Schedule – Create a recurring schedule that repeats on a weekly basis.
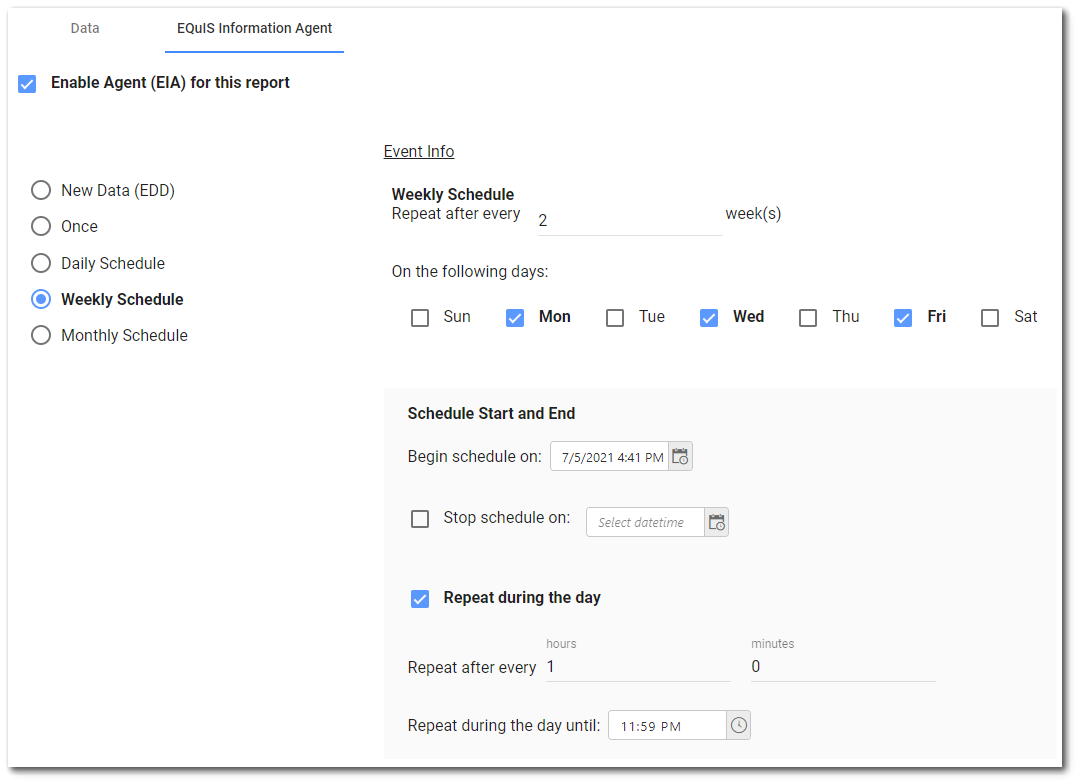
Weekly schedules are configured as:
Weekly Schedule
•Repeat after every ___ week(s) – Define a schedule that runs every N weeks. If left blank, then the value one (1) is assumed.
•On the following days – Check the box for the day(s) of the week that the agent should run. At least one day must be selected.
Scheduled Start and End
•Begin Schedule On – The date/time the schedule will begin. This is a required field. The hour portion of the time field is corrected from UTC. If "Repeat during the day" is enabled, the time recurrence is relative to this time.
•Stop Schedule On – The date/time when the recurrence should end. This field must be enabled by selecting the check box. When null, the recurrence has no end.
•Repeat during the day – Schedule the agent to run more than once per day by checking this option.
•Repeat after every – These fields are enabled by the above check box. When enabled, the valid range of values is 0 to 23 hours and 0 to 59 minutes.
•Repeat during the day until – This option is enabled by the above check box. The hour portion of the time field is corrected from UTC and may represent a time either on the previous day or the following day. The end time must be after "Start Time." The end time will be 11:59 PM or 23:59, local time, by default.
Monthly Schedule – Create a recurring schedule that repeats on a monthly basis that occurs every calendar month that is selected. The monthly schedule may also be used for yearly or quarterly recurrence.
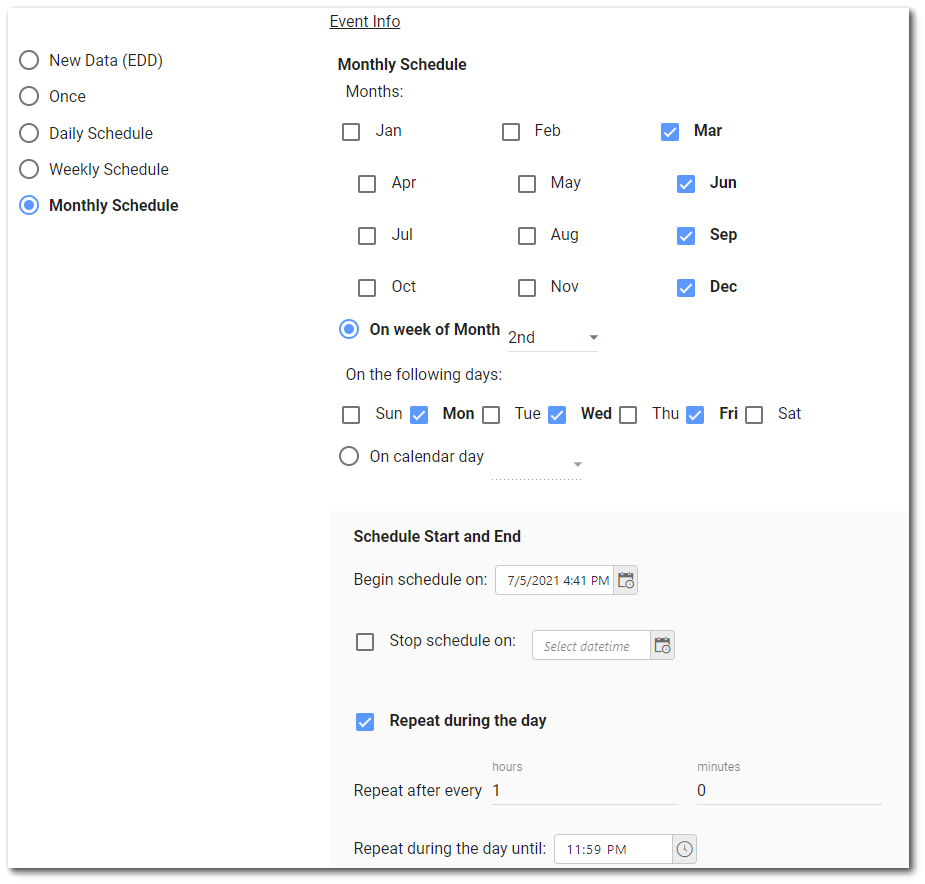
Monthly schedules are configured as:
Monthly Schedule
•Months – Select the months that the recurrence may be scheduled. At least one month must be selected.
•On Week of Month – Allows a schedule to be setup on a specific week of the month. Note that selecting the "5th" week of a month will not be applicable to every month and the schedule may not run these months.
•On the following days – This option is active when the "On Week of Month" option is selected. Check the box for the day(s) of the week that the agent should run. At least one day must be selected. The report will run on the days of the week for that week using the scheduled Start and End settings on that day.
•On Calendar Day – Schedule the agent to run on the specified date of the month. This option is mutually exclusive with the "On Week of month" option. Note that some calendar days are not applicable to every month (such as February 30 or 31) and the schedule will not run on these days.
Scheduled Start and End
•Begin Schedule On – The date/time the schedule will begin. This is a required field. The hour portion of the time field is corrected from UTC. If "Repeat during the day" is enabled, the time recurrence is relative to this time.
•Stop Schedule On – The date/time when the recurrence should end. This field must be enabled by selecting the check box. When null, the recurrence has no end.
•Repeat during the day – Schedule the agent to run more than once per day by checking this option.
•Repeat after every – These fields are enabled by the above check box. When enabled, the valid range of values is 0 to 23 hours and 0 to 59 minutes.
•Repeat during the day until – This option is enabled by the above check box. The hour portion of the time field is corrected from UTC and may represent a time either on the previous day or the following day. The end time must be after "Start Time." The end time will be 11:59 PM or 23:59, local time, by default.
Scheduling Note: Agents are not guaranteed to run at the exact time they are scheduled. The "Workflow Heartbeat" agent runs every minute (by default) and queues Report Generate tasks when an agent should have run at least once since the last time the schedule was evaluated. The report is not actually run until the "Report Generate" agent processes that entry in the queue. Even under ideal conditions, it could be several minutes before the report is actually run. Also, If EQuIS Enterprise Workflow is down for several days then resumes operation, an agent that may have been scheduled to run several times during the outage will be queued to run only once when the operation resumes. |
Notification and Delivery Method
Either enter information for the Notice (Web/Email) that will be used when the EIA sends the notification email OR configure a Webhook as the notification method (see below). Select the desired option and configure settings as appropriate.
Note: The EIA can be configured to send as an email or as a webhook, but not both. If the Webhook tab is populated, the EIA will be treated as a webhook EIA. |
|---|
|
|
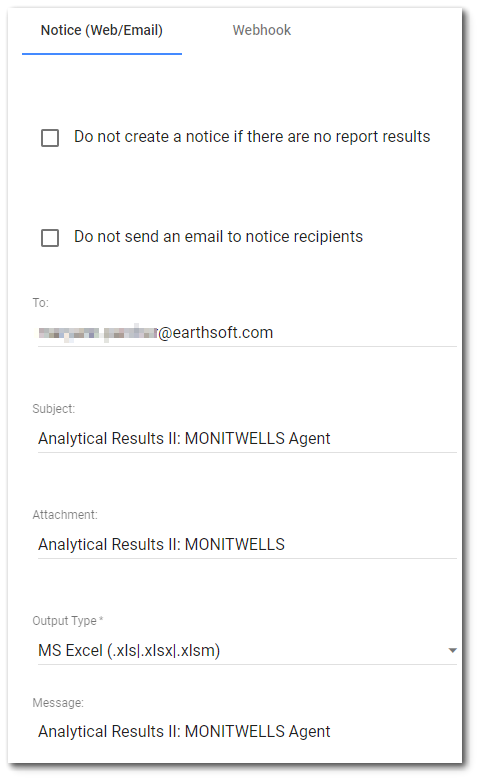
Email Notice Information
Do not create a notice if there are no report results – When this box is checked, a notice will not be created if the EIA runs and no report results are obtained.
Do not send an email to notice recipients – Check this box to turn off notifying EIA recipients by email (restricts EIAs to only web notices).
To – Enter a comma-separated list of email addresses. This field will be pre-populated with the email address of the current user. The email addresses may be other users, but are not required to be. If you enter an email address that does not exist as a user, that user will be created as a Limited User.
Subject – Enter the subject of the notice/email. See Replacement Tags below for additional information.
Attachment – Enter the file name for the attachment and select the desired file type. See Replacement Tags below for additional information.
Output Type – Select output type for the report from the drop-down options.
Message – Enter the body of the notice/email. See Replacement Tags below for additional information.
Replacement Tags
Attachment, Subject, and Message may contain replacement tags that will be replaced with the run time values. The following tags are valid for EIA agents.
{Message} – Original message template
{Attachment} – Attachment name
{dataSubmitter} – In the "To" (recipient) field of a New Data EIA will send the EIA to the data Submitter
{ReportInfo.AssemblyName} – Base Report Assembly Name
{ReportName} – Base Report Display Name
{ReportInfo.DisplayName} – Base Report Display Name
{ReportInfo.Id} – Base Report ID
{ReportInfo.Name} – Base report Name
{ReportInfo.ObjectName} – Base Report Object Name
{ReportInfo.ReportType} – Base Report Report Type
{PickReportName} – User Report Name
{UserReportInfo.FacilityId} – User Report Facility ID
{UserReportInfo.Name} – User Report Name
{UserReportInfo.ReportId} – User Report Report ID
{UserReportInfo.UserId} – User Report Owner's User ID
{UserReportInfo.UserReportId} – User Report User Report ID
{AgentName} – EQuIS Information Agent Name
{ReportEventInfo.Name} – EQuIS Information Agent Name
{ReportEventInfo.OutputType} – EQuIS Information Agent Output Type
{ReportEventInfo.EventType} – EQuIS Information Agent Event Type
{ReportEventInfo.EventTypeDesc} – EQuIS Information Agent Event Type Desc
{ReportEventInfo.FormatName} – EQuIS Information Agent Format Name
{ReportEventInfo.ReportEventId} – EQuIS Information Agent Report Event ID
{ReportEventInfo.UserId} – EQuIS Information Agent Owner's User ID
{ReportEventInfo.UserReportId} – EQuIS Information Agent User Report ID
{ReportEventInfo.WaitingReportId} – EQuIS Information Agent Waiting Report ID
For scheduled and EDD agents, the UserReportId is the ID of the user report run. For Trigger agents, it is the trigger report's UserReportId and WaitingReportId is the ID of the user report run.
{FacilityCode} – Facility Code
{FacilityName} – Facility Name
{FacilityCity} – Facility City
{FacilityClient} – Facility Client
{FacilityCountry} – Facility Country
{FacilityCounty} – Facility County
{FacilityPhoneNumber} – Facility Phone Number
{FacilityPostalCode} – Facility Postal Code
{FacilityProjectManager} – Facility Project Manager
{FacilityState} – Facility State
{FacilityAddress} – Facility Address
{Connection.Database} – Name of the EQuIS Database
{Connection.Edition} – Edition of the RDBMS Hosting the EQuIS Database
{Connection.Server} – Name of the Server Hosting the EQuIS Database
{Parameters} – A ';' delimited list of parameter name and value pairs for all report parameters. Alternatively, individual parameter values may be referenced by name. For example {Parameters.sys_loc_code} will be replaced with the value of the parameter @sys_loc_code. Any substitution tags of the form {Parameters.item} will be removed if that parameter is not found in the report.
{DateTime} – Date and time that the report was completed in server's local timezone
{DateTimeUTC} – Date and time that the report was completed in UTC timezone
For reports that produce tabular data (e.g., IGridReport, RDL), tags may be included that will be replaced with data from the report output table. Even though the report output itself is attached to the email, it may be useful to have the email subject or body include data from the report output. To include data from the report output, use a tag of {DataTable.column_name}, where column_name (all uppercase or all lowercase, not mixed case) is the name of a column in the report output. If the column_name used in the tag is not a valid column name, the tag will not be replaced (the tag itself will remain in the notice). If the column_name is a valid column name, the tag will be replaced by a comma-separated list of all unique values found in that column. A null value will be represented in the list as "(null)". For example, the following tags may be used as indicated:
{DataTable.sys_loc_code} – A list of all unique sys_loc_code values in the report output table
{DataTable.sample_date} – A list of all unique sample_date values in the report output table
{DataTable.matrix_code} – A list of all unique matrix_code values in the report output table
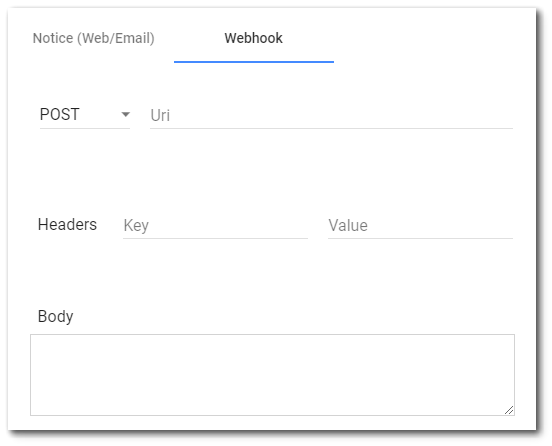
Webhook Configuration
An EQuIS webhook is a type of EIA that connects to a external Web service, such as Microsoft Power Automate, Teams, SharePoint, Logic Apps, etc. Whenever an EIA trigger event occurs (scheduled or new data load), the webhook makes an HTTP request to the URI configured in the webhook. The body of the webhook can be configured to populate with report data.
HTTP Method – (Required) Select the HTTP method as required by the external web service. GET and POST are supported.
URI – (Required) Enter the URI of the external web service.
Headers – (Optional) Add one or more headers as required by the external web service. Another header line will display after populating the Key field and either pressing the Tab key or navigating away from the input box.
To paginate report output, set the Content-Range header equal to the page size.
Example: Content-Range: 100
This will result in the report output being broken up into pages of 100, and each hook request being sent separately with a Content-Range header in the following format "rows x-y/z", where z is the total number of rows in the report, and x and y are the lower and upper bound of the rows in the request.
Note: When opening the editor for a webhook EIA, an "Authorization" header Key field will always display the Authorization value as null for security purposes. |
Body – Enter custom message. If left empty, the body will be the EIA's report output.
When using JSON to configure the body of a webhook, it is possible to set the JSON "data" property value to "DATA_ROW_ARRAY". This will set the "data" property to the EIA's report output.
Example:
{ "template": { "name":"my-jsreport-template" }, "data": "DATA_ROW_ARRAY"}
The "data" JSON property is the most used, however, certain software may use other naming conventions for their data property (e.g., "rows" instead of "data" for Power BI). This may result in negative consequences if the "data" property uses "DATA_ROW_ARRAY" for the naming convention instead of “data” (e.g., "DATA_ROW_ARRAY":"DATA_ROW_ARRAY").
Note: The Hook Process Agent must be running for webhooks to process. |