Users can view the status of EDDs that have been submitted and processed by Enterprise EDP with the EDP EDD Status widget. The widget can be viewed on the standard EDP dashboard or can be added to a user dashboard. Users with both EDD Viewer and Facility Viewer permissions will see all EDDs processed by Enterprise EDP.

The list of EDDs can be sorted or filtered based on status, file name, channel, date, facility, and submitter. The columns are sortable by clicking on the column header (click again to reverse the sort). Use the Status drop-down menu to filter the returned records based on the status of the EDD (All, Successful, Errors, In Progress, or Stuck). To filter the EDDs by file name, channel, date, facility, or submitter, enter a search term (one or more characters) in the appropriate search box beneath the column header.
Channel denotes how the EDD was submitted:
•EML – One of the email retrieval agents
•FTP – File Transfer Protocol site
•Web – Enterprise EDP or REST API
•Pro – Professional EDP (EDDs that have been uploaded directly to the database via Professional EDP)
The bottom of the widget contains paging controls for displaying a limited number of EDDs at a time, as described below.
Arrows – Use the left/right arrows to navigate through pages.
Go to Page List – Select a specific page to navigate directly to that page.
Rows per Page – Change the number of EDDs to be displayed per page by using the drop-down menu.
Count of Pages and Total Items – This control indicates the total number of EDDs available in the widget, how many pages to display the EDDs, and which page is currently selected.
EDD Status
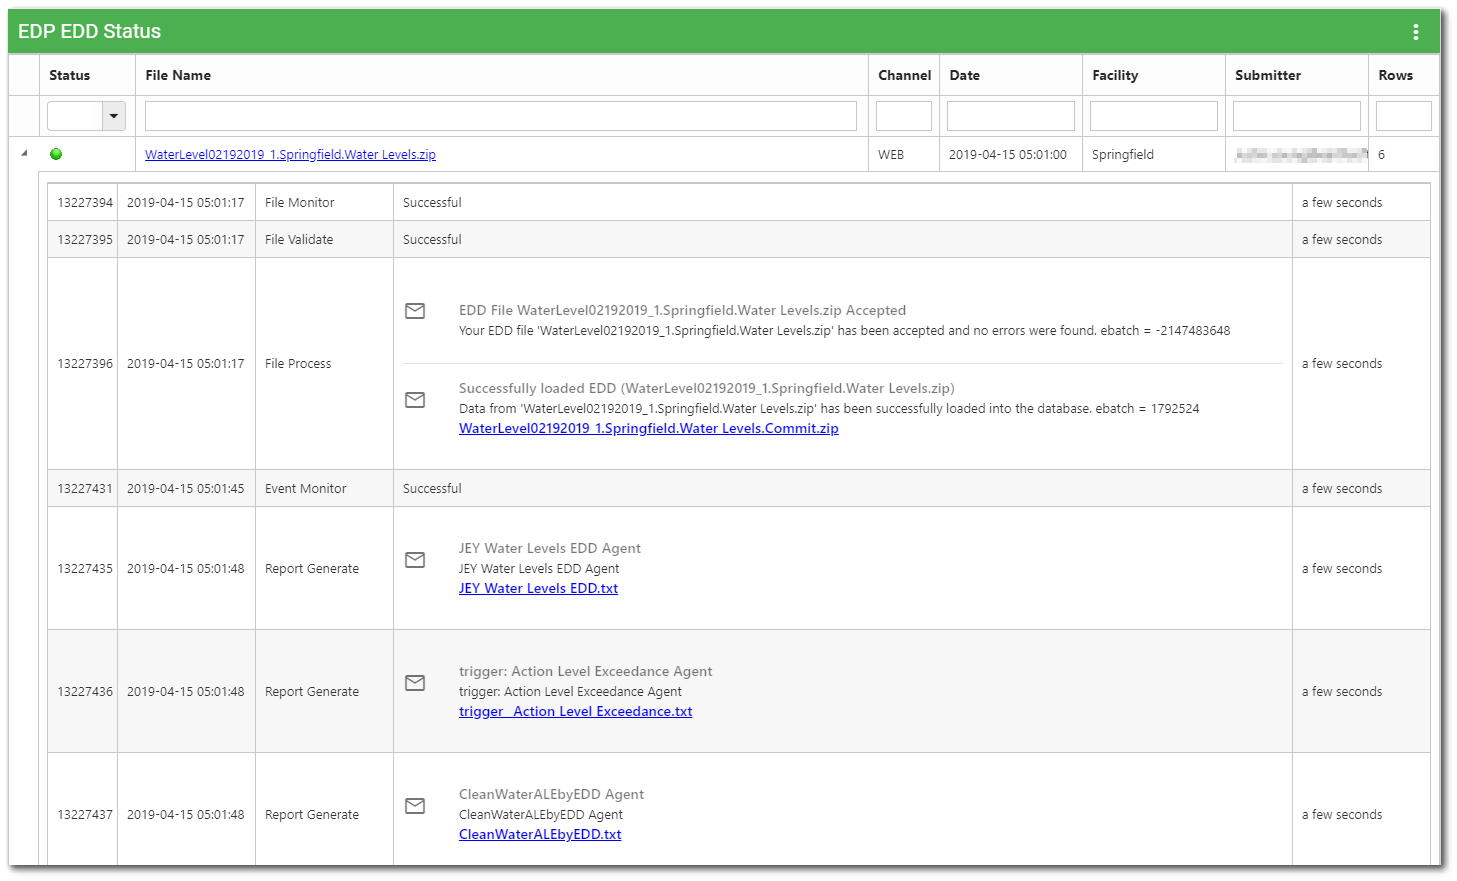
The status of the EDD is defined as "Successful", "Errors", "In Progress", "Stuck", and "Rolled Back". The status column will have a green icon if the EDD data was successfully committed to the database. If any errors prevented the EDD data from being committed to the database, the status column displays a red icon. The status column will have a yellow icon if the EDD was rolled back after commit or if the status of the data load cannot be determined. The status column displays a blue icon if the EDD processing is not complete. The status is determined by one of the File Validate, File Process, or API Upload tasks.
Operations used by Enterprise EDP to process an EDD file are defined in the ST_SERVICE_RESERVATION table and are executed as items in the ST_TASK table. Possible operations are:
1.File Monitor – This process monitors the channel folder and loads EDDs to the ST_FILE_REGISTRATION table in the database. Creates a file validate task for the next operation.
2.File Validate – Validates that the EDD file follows the correct naming convention. Checks the user certificate to validate the user and verify that they have permissions to the specified facility.
3.File Process – Processes the data in the EDD by checking for errors and committing the data to the database. This is the execution of EDP without a user interface.
4.Event Monitor – Reviews EIAs and conditionally creates tasks for report generator.
5.Report Generate – Executes any EIA reports queued in the ST_TASK table.
6.API Upload – Indicates an EDD uploaded via a REST API. File validation was performed immediately. Thus, an EDD with this status will not have a File Monitor or File Validate task.
By clicking the triangle to the left of the color display icon in the status column, details about all Tasks and Notices associated with the job that loaded the EDD will be displayed. Hovering the mouse over the status icon produces a tooltip with the JobID. Hovering the mouse over the EDD file name produces a tooltip displaying the eBatch and checksum values for the file.The EDD can be downloaded by clicking the hyperlinked EDD file name. Any reports or commit logs generated by the EDD can be downloaded by clicking the hyperlinked file name.
Note: Users with at least Editor permission to the selected facility can download and review the commit logs. |
Widget Properties
To change properties of the EDP EDD Status widget, open the Widget Editor by selecting the More Options ![]() icon in the upper right corner of the widget to display the drop-down menu and then select the Edit menu option.
icon in the upper right corner of the widget to display the drop-down menu and then select the Edit menu option.
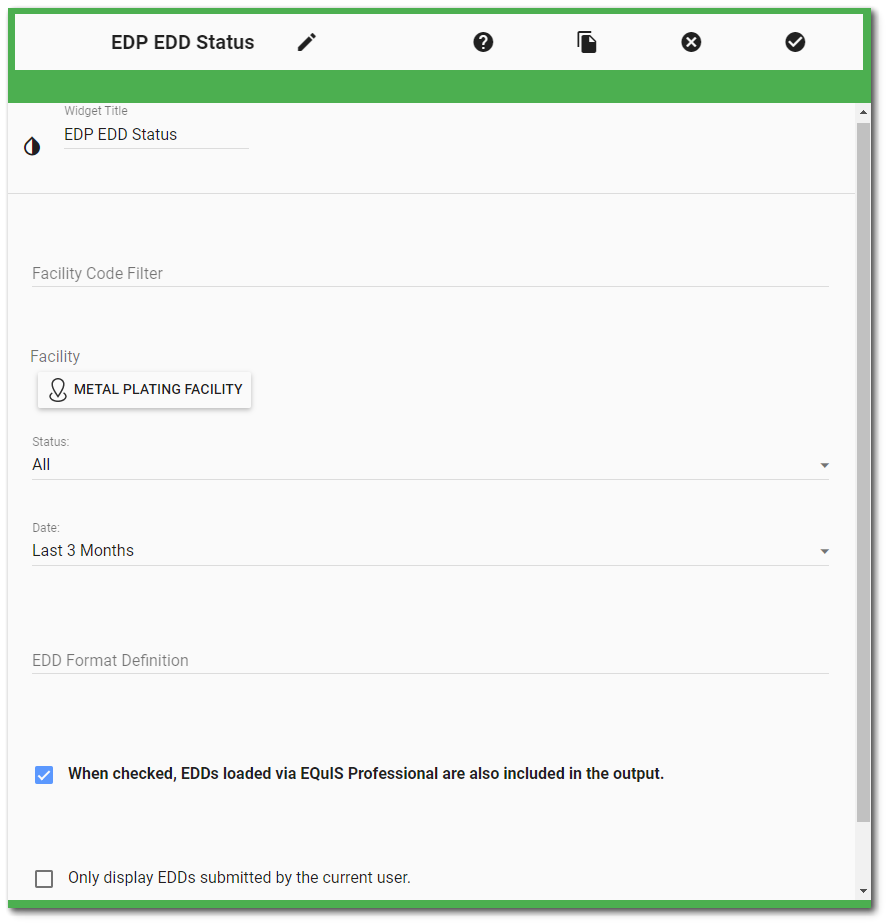
Widget Title – By default, the widget title is EDP EDD Status. The title can be modified.
Widget Color – The color of the widget can be changed using the Widget Theme![]() icon to the left of the widget title.
icon to the left of the widget title.
Facility Code Filter – This is a legacy setting used to filter the list to a specific facility when the facility code is entered. Users still using facility code to modify their widgets are advised to use the Facility Chooser instead.
Facility – Use the Facility Chooser to limit the results to those EDDs submitted to specific facility or for any of the facilities in a facility group. This is the preferred method to filter the list for EDDs submitted.
Status – The Status drop-down menu can be set to filter the returned records based on the status of the EDD (All, Successful, Errors, In Progress, or Stuck). When the status filter has been applied within the widget properties, the status will be displayed as a number on the surface of the widget. The number values are equivalent to the following:
Status: 2 = Successful
Status: 3 = Errors
Status: 4 = In Progress
Status: 5 = Stuck
Date – The Date drop-down menu can be set to filter the records based on the date submitted. The options include Today, Last 7 Days, Last Month, Last 3 Months, All, and Custom. When Custom is selected, users must specify the "Last Number of Days" to set the date filter.
EDD Format Definition – Enter the EDD format to restrict EDD status display to only the specified EDD format.
EQuIS Professional Check Box – EQuIS Professional Check Box – Select this option to also display EDDs that have been uploaded directly to the database via Professional EDP but not using the RegisterFile option. These EDDs will be denoted with "Pro" in the Channel column. By default, EDDs loaded through Professional EDP using the RegisterFile option will show in the EDD grid.
EDD Check Box – When the"Only display EDDs submitted by the current user" option is checked, only EDDs submitted by the currently authenticated user will be displayed in the widget.
The widget will display EDDs loaded via Enterprise EDP and successful submittals via EQuIS Professional EDP associated to the ALS user when the following are checked: "EDDs loaded via EQuIS Professional are also included in the output" and "Only display EDDs submitted by the current user."
Widget Object Editor – To set various appearance properties of the widget, select the Object Editor ![]() icon in the widget header to open the Widget Object Editor. See the Widget Editor article for more details.
icon in the widget header to open the Widget Object Editor. See the Widget Editor article for more details.
Help – The Help ![]() icon connects to the online documentation related to the specific widget.
icon connects to the online documentation related to the specific widget.
Copy Settings – Select the Copy Settings ![]() icon to to copy the settings from another widget of the same type. See the Copy Widget Settings article for more information.
icon to to copy the settings from another widget of the same type. See the Copy Widget Settings article for more information.
Cancel – Select the Close without Saving ![]() icon to exit the Widget Editor without saving changes.
icon to exit the Widget Editor without saving changes.
Save – Changes will be applied to the widget by clicking on the Save ![]() icon. The Widget Editor screen will close after the save operation is complete.
icon. The Widget Editor screen will close after the save operation is complete.
EDD Processing
An EDD is considered fully processed after it has passed all steps—File Monitor, File Validate, and File Process. The 'Accepted' notice is generated after the File Validate step, but before the File Process step that actually loads the EDD and commits it to the database.
Each of these steps work independently and will sleep for a configured time between tasks to allow other agents CPU time. The default sleep time is 5 minutes. The time it takes an EDD to pass all three steps may vary between the sum of the time it takes all three agents to process (e.g., 15 minutes) plus the sum of the time it takes each individual agent to process. To reduce the time it takes to run each agent, go to the workflow settings and reduce the sleep seconds for optimal performance.
Sleep Seconds sets the minimum number of seconds the service will sleep. For example, if in the File Monitor tab a Sleep Seconds value of 300 used in conjunction with a Max Tasks value of 1, the File Monitor service will process at most 1 (Max Tasks = 1) EDD every 5 minutes (Sleep Seconds = 300). This setting can be modified by administrator users as described in the Workflow widget article.
Note: After an EDD has passed through the File Process step and is marked as "Successfully Completed" in the EDP EDD Status widget, EarthSoft recommends opening the attached Commit log to verify that all records included in the EDD were processed as expected. |