•Create Role(s) for EQuIS Professional Users
•Create EQuIS Enterprise Users and Assign Roles and Permissions
EQuIS Professional users may be configured at the database level, i.e. with a direct login to the EQuIS Database where security is controlled by the SQL Server Database and is managed by the DBA. This is a database-level security or DLS user. Since this type of user connects directly to the EQuIS Database, there is greater access by default, e.g. there is no limitation on facility access unless manually configured in SQL Server by the DBA.
EQuIS Professional also supports Application Level Security (ALS) users with facility-specific and other permission options configured by EQuIS administrators in EQuIS Enterprise. EQuIS ALS users have access to Professional using the same facility subscription mechanism used by EQuIS Enterprise. This facilitates EQuIS user management and decreases the effort required by the DBA to create and maintain EQuIS Professional users.
Warning: Potential Security Vulnerability: When using ALS, EQuIS Professional still uses a database connection string to make a direct TCP/IP connection to the database server. The encrypted connection string is sent via HTTPS response from EQuIS Enterprise to EQuIS Professional. EQuIS Professional decrypts the connection string and establishes the TCP/IP connection to the database using the credentials provided in the connection string.
EQuIS Professional hides the connection string from the user, so a typical user will never see the connection string or the credentials used to connect to the database. Without access to the connection string, a typical user will only be able to log in to the database using EQuIS Professional, and will only be able to use facilities they are subscribed to. |
Create Role(s) for EQuIS Professional Users
The first step in configuring ALS for EQuIS Professional is to decide how EQuIS Professional users will be using the data. For example, it may be necessary to limit these users to read-only permissions or perhaps have one group of users that are read-only, and another group of users that are read-write or perhaps have a group of users that can read/write data tables (i.e. DT_*), but can only read reference tables (i.e. RT_*).
Note: Only one Application Level Security role can be assigned per user. |
After deciding which role(s) are necessary for user access needs within the organization, create the corresponding role(s) using the Enterprise Role Profile Editor.
For EQuIS functionality, the most basic user (read only), will need read/write access to the following tables:
•ST_USAGE: Report use logging
•ST_USER_REPORT: Save User Reports
•ST_USER_REPORT_PARAMETER: Save User Report parameters
•ST_LICENSE_USE: Use network license
•ST_USER: Update Login Time
•ST_ID: Updates EUIDs
In order to grant users access to the functionality in the Group Maintenance Interface, EarthSoft recommends insert/update/delete on the following tables, (this is optional):
•RT_GROUP
•RT_GROUP_MEMBER
•RT_MTH_ANL_GROUP
•RT_MTH_ANL_GROUP_MEMBER
Note: Additional permissions for each role (and for specific users) can be granted using the permissions grid within the Enterprise Role Profile Editor. Examples include, access to specific facilities, reports, and/or buttons within EQuIS Professional. By default, existing ALS roles that were created prior to the 19144 Build will be automatically granted Viewer permission to all Ribbon Tools in EQuIS Professional upon upgrade. However, newly created ALS roles will not have any permissions in the permissions grid; these will need to be assigned. |
Create Database Login(s)
Once the necessary roles have been defined, the DBA needs to create a separate database login for each role. The login created should have the appropriate database permissions (and synonyms, where applicable) for the group of users that will be using that role.
After creating the database login for each role, update the CONNECTION_STRING field for each record added to the ST_ROLE table. The connection string should be a valid .NET database connection string of the following form:
•SQL Server: Data Source=dbserver;User ID=username;Password=password;Database=dbname
Note that any advanced connection parameters such as Connection Timeout, should be added here for the desired roles.
Warning: SkipIsSameConnection: In order to ensure that both EQuIS Professional and EQuIS Enterprise are connected to the same database, the ALS web service (e.g. ./equis/remoteLogin.asmx) will compare the connection string from ST_ROLE.CONNECTION_STRING with the connection string in the web.config file. If the Data Source attribute or the database of those connection strings is different, the user will not be able to log in to EQuIS Professional. In some situations, the Data Source must be different (e.g. an external IP address versus internal IP address). Disable the comparison by adding the following <appSetting> to web.config:
<add key="SkipIsSameConnection" value="true" /> |
Read SqlConnection.ConnectionString Property for more about Microsoft SQL connection strings.
Example Connection Strings:
The following examples presume a connection to a server named CorpDBMS01 with a database named 'EQUIS', username 'equis_service', and password 'pa$$w0rd'.
Microsoft SQL Server using SQL Credentials
•Data Source=CorpDMS01; Database=EQUIS; User ID=equis_service; Password=pa$$w0rd
Microsoft SQL Server using Windows Active Directory Credentials
•Data Source=CorpDMS01; Database=EQUIS; Integrated Security=SSPI
Note: The first time a user logs in to EQuIS Professional using ALS, the ST_ROLE.CONNECTION_STRING will be automatically encrypted in the database. |
Create EQuIS Enterprise Users and Assign Roles and Permissions
The next step is to create user accounts in EQuIS Enterprise. An EQuIS Enterprise administrator can create each user account from the standard Administration Dashboard or each user can register for his or her own account. Once the account has been created, an EQuIS Enterprise administrator needs to activate the account and assign the user to one or more Enterprise roles. An Enterprise user may be assigned to multiple Enterprise roles (Administrator, Manager, and/or User) and a Professional ALS role (ProReader, ProWriter), but only one ALS role should be assigned per Enterprise user account. The ability for the user to log in to either application is based on the roles assigned. For example, there may be some users that can log in to Enterprise, but not Professional and vice versa. There may also be some users that can log in to both Enterprise and Professional.
After assigning the roles, ensure that the user has at least Viewer permission on one or more facilities as well as access to required buttons on the EQuIS Professional ribbon.
Log In to EQuIS Professional
When the previous steps have been completed, log in to EQuIS Professional using ALS. On the EQuIS Professional Connection screen, enter the following information as shown in the example below.
•Server Name: <the full URL to the EQuIS Enterprise application>
•Server Type: EQuIS Enterprise Login
•User Name: <the username of the EQuIS Enterprise user account created>
•Password: <the password of the EQuIS Enterprise user account created>
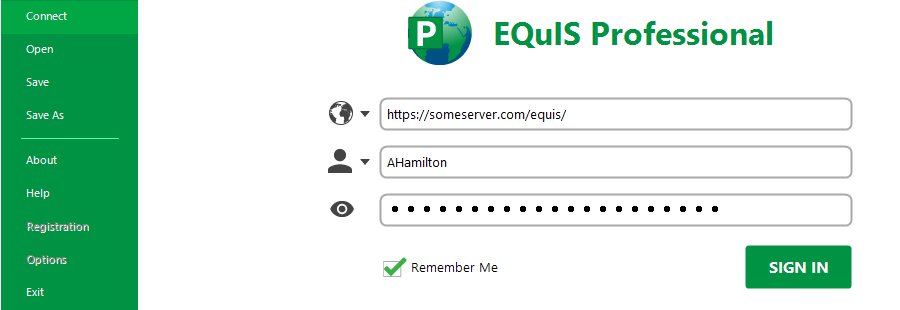
Note: If the server name begins with HTTPS, the EQuIS Enterprise login radio button will automatically be selected, as only connections with HTTPS in the Server Name will use Enterprise. |
Application Level Security
Application Level Security (ALS) is a feature implemented in EQuIS that allows the integration of Enterprise logins with EQuIS Professional.
Using ALS, the DBA only needs to create a handful of user account types in the database. The EQuIS Enterprise administrator can assign access to these accounts to EQuIS Professional users by role assignment. Once a user has been assigned an ALS login by their DBA, they will then use their Enterprise login (username and password) when logging into EQuIS Professional.
How ALS Works
When using EQuIS Professional with ALS, the steps listed below are executed.
1.EQuIS Professional makes an HTTPS request to the ./remoteLogin.asmx web service at whatever Enterprise URL is provided by the user (i.e. http://www.someserver.com/equis/remoteLogin.asmx).
2.EQuIS Professional passes the username and password (encrypted) provided by the user as parameters to the web service.
3.The web service uses the "databaseConnection" connection string (in web.config) to connect to the EQuIS Database.
4.The web service validates the username and password against the ST_USER table in the database.
5.If username and password are valid, the web service looks in ST_ROLE and ST_USER_ROLE to determine if the user is assigned to an ALS role.
6.If the user is assigned to an ALS role, the web service retrieves the connection string from ST_ROLE.CONNECTION_STRING for the appropriate role.
7.The web service compares the ALS connection string with the databaseConnection string (in web.config) to make sure both connection strings point to the same server and database (but not necessarily the same SQL login). This comparison ensures that the user is actually connected to the correct database.
8.If the connection strings use the same server and database, the web service encrypts the ALS connection string and returns the encrypted connection string as the web service response.
9.EQuIS Professional decrypts the ALS connection string and opens a database connection over TCP/IP. SQL Server, and any applicable firewalls must be configured to allow TCP/IP connections from the end-user workstation using the ALS connection string.
Note: Users assigned to the "Admin" role in EQuIS Enterprise must also be assigned to an ALS role in order to be able to log in to EQuIS Professional. In builds 7.20.2 and earlier, administrators were able to establish ALS connections without actually being assigned as a member of an ALS role. Starting in builds 7.20.3 and higher, the functionality has changed such that administrators (like everyone else) may not establish an ALS connection without being a member of an ALS role. |