•Load Reference Values as an EDD
•Import Reference Values from Existing .rvf File
•Import New Reference Values during Field or Lab EDD Import
•Confirm Status of Recently Imported Reference Values
Reference values can be loaded (imported) using the EQuIS Data Processor (EDP) via EQuIS Professional.
Refvals Format
To load reference values as an EDD, use the Refvals format. This format contains all standard EQuIS reference tables and reflects the table structure as it exists in the database. Each reference table exists as its own section in the format file.
To load reference data using the Refvals format file, EDD files containing the new reference values must first be created.
Warnings When Creating EDD Files: •The included values must match the expected values in the appropriate sections of the Refvals format. •.txt files file name(s) must match the appropriate section name(s) in the Refvals format. •The Excel files Worksheet name(s) must match the appropriate section name(s) in the Refvals format. |
Load Reference Values as an EDD
1.Click to open EDP, then click Format.
2.Browse to the standard Formats folder, typically C:\Program Files\EarthSoft\EQuIS\Formats\EarthSoft\refvals.zip or, for per-user installation, %localappdata%\Programs\EarthSoft\EQuIS\Formats\EarthSoft\refvals.zip, and click Open.
3.Click EDD and select the file containing the values to be loaded. This loads the file into EDP.
4.Select the Professional tab and click Create in the Package group to import the data into EQuIS Professional.
5.If no errors are present, click Commit in the Package group.
Import Reference Values from Existing .rvf File
1.Change the extension of your .rvf file to .xml (e.g. change references.rvf to references.xml).
2.Click to open EDP, then click Format.
3.Open the refvals.zip file (e.g. C:\Program Files\EarthSoft\EQuIS\Formats\EarthSoft\refvals.zip or, or, per-user installation, %localappdata%\Programs\EarthSoft\EQuIS\Formats\EarthSoft\).
4.Click EDD and select your references.xml file.
5.Fix any errors (STATUS_FLAG, E_BATCH, and DISPLAY_ORDER columns should have been removed previously).
6.Select the Professional tab and click Create in the Package group to import the data into EQuIS Professional.
7.Click Commit.
Import New Reference Values during Field or Lab EDD Import
When importing field or lab data into EQuIS Professional while using EDP, right-click on any missing reference values to be imported and select Add All Values, All Formats, Add By Column or Add By Value.
Note: When using this method to import missing reference values, add additional information to the value that is added (e.g. add description fields and change the status flag(s) to A for accepted). |
Confirm Status of Recently Imported Reference Values
To confirm if the reference value data from a previously loaded EDD is active, review the STATUS_FLAG in the data table(s).
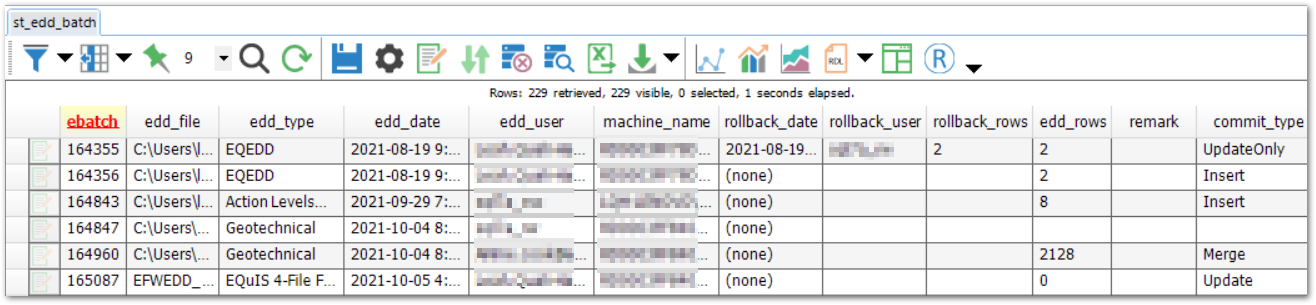
1.Open ST_EDD_BATCH by clicking on Tables in the Open section of the Home tab and selecting System Tables, and locate the associated entry for the data load which added the reference values. Note the associated ebatch number and close the table. Do not save any changes. Note that in some cases, user permissions will not allow access to the System Tables. The same information can be obtained from the EDD Rollback window (EDP - Professional - EDD Rollback).
2.Open the Reference Table(s) for review.
3.Locate the STATUS_FLAG field in the table(s). Filter this field for any values that are set to R by clicking the Filter ![]() button.
button.
A STATUS_FLAG of R indicates that the associated values are not active and will not be referenced by EDP when loading data. In some cases, it is appropriate to set a status_flag to R, for example if a method has been retired. However, here, all of the newly added values should have the STATUS_FLAG set to A. Locate the data associated with a specific EDD data load by searching for the EBATCH number noted in Step 1 above.