![]() Using the Reports button from the ArcEQuIS toolbar you can run EQuIS Reports directly in ArcGIS Pro and automatically add them to your map. Certain saved user reports are also available using the Add Data button. Use the steps below to run, as you would in EQuIS Professional, directly from ArcGIS Pro.
Using the Reports button from the ArcEQuIS toolbar you can run EQuIS Reports directly in ArcGIS Pro and automatically add them to your map. Certain saved user reports are also available using the Add Data button. Use the steps below to run, as you would in EQuIS Professional, directly from ArcGIS Pro.
Currently Supported Reports
•Action Level Exceedance II
•Analytical Results II
•Water Levels II
•Location Information (Class)
Other reports can run successfully and full support will be added in future builds. Contact support@earthsoft.com to request inclusion of a specific report.
Run EQuIS Report in ArcGIS Pro
Only reports that are published to the database will be available to run directly from ArcGIS Pro. Instructions on publishing reports can be found here.
1.Click the Add Site button and enter your login credentials to connect to an EQuIS database.
2.Click the Add Data button, select the desired facility, add the locations Point layer (either as a link or snapshot).
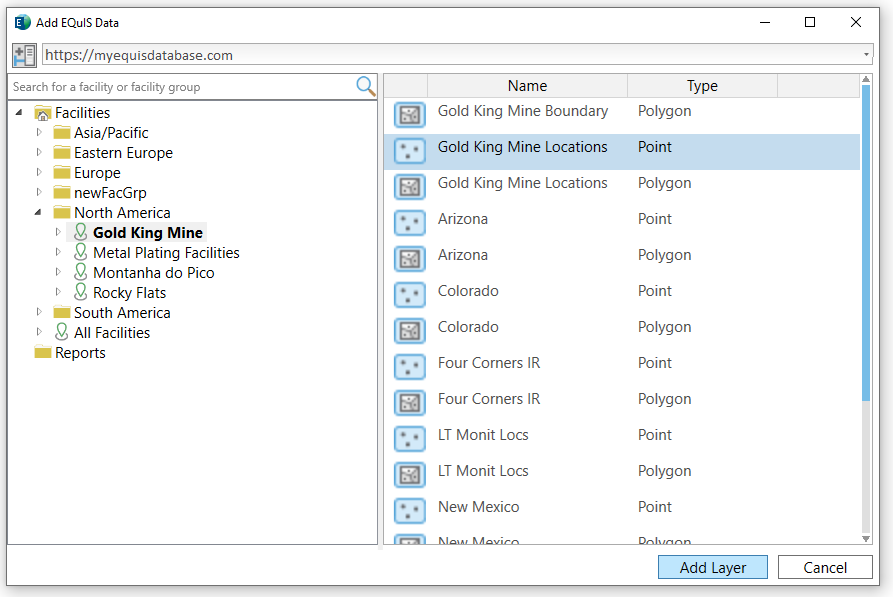
3.Select the Locations point layer in the Contents Pane (typically on the left). The Reports button should now be activated. Note that adding and selecting the Locations point layer determines the EQuIS facility that will be used when running reports and is required before the button will be non-greyed out.
4.Click the Reports button from the EQuIS toolbar in the top ribbon. This will open the Open window from EQuIS Professional.
5.Select the report to run from the supported list documented. Note that all published reports typically available in EQuIS Professional will be displayed in ArcGIS Pro; however, some (such as crosstabs, those that export directly to Excel or those that do not contain location data) cannot be added to the map in ArcGIS Pro.
6.Select the desired report parameters. Click the Go arrow ![]() to run the report.
to run the report.
7.When you are satisfied with the report output, click the back arrow ![]() to return to the report parameter screen and enter a name for the User report. Click the Export Query as an ArcGIS layer button
to return to the report parameter screen and enter a name for the User report. Click the Export Query as an ArcGIS layer button ![]() (within the reports toolbar) to add the data to the map.
(within the reports toolbar) to add the data to the map.
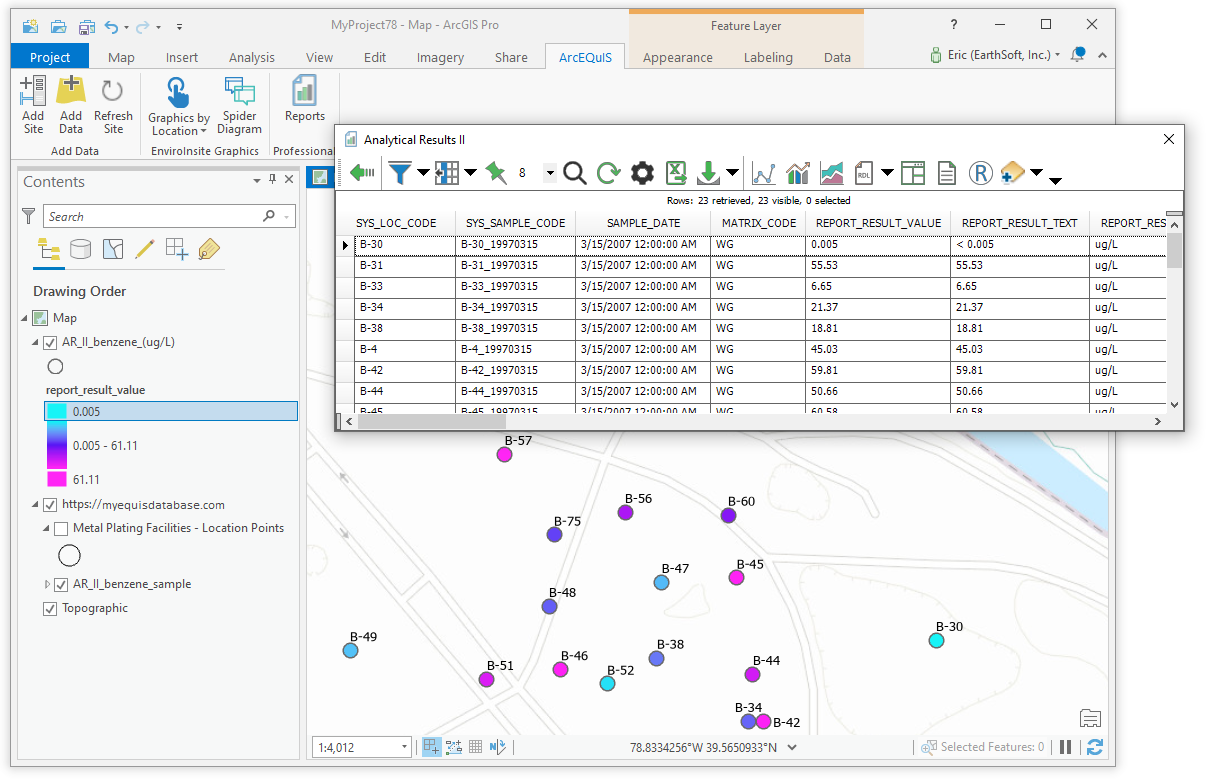
Note: While the filter rows typically available in EQuIS Professional are available here, to filter the grid of the displayed report results, any selected filters will not be applied to the data added to ArcGIS Pro. Once the layer is added to ArcGIS Pro, the data can be filtered using the ArcGIS Pro Definition Query (right-click the layer in the Contents Pane and select Properties > Definition Query). |
Running reports from ArcGIS will create a saved user report, and as such requires that users be assigned to an ALS role and have at least read/write permissions to the database they are working in.
Analytical Results II and Action Level Exceedances II saved user reports can also be added to an ArcGIS Pro map using the Add Data button on the ArcEQuIS ribbon.
Known Issues
1.When Windows display scale is set to greater than 100% some misalignment may occur in the Report Parameter Selector.

2.Within the EQuIS Reports window, If the Export Query as an ArcGIS layer button ![]() is missing from the toolbar, delete EarthSoft.Reports.Toolbar.en-US.7.0.0.0.xml from C:\Users\[Username]\AppData\Roaming\EarthSoft and close and reopen EQuIS Professional and ArcGIS Pro. Previous saved toolbar configurations may interfere with the buttons on the toolbar.
is missing from the toolbar, delete EarthSoft.Reports.Toolbar.en-US.7.0.0.0.xml from C:\Users\[Username]\AppData\Roaming\EarthSoft and close and reopen EQuIS Professional and ArcGIS Pro. Previous saved toolbar configurations may interfere with the buttons on the toolbar.